Prerequisites:
Everything under The Basics
Overview:
In UnrealEd, you create a "mover brush" to get a door to work. Deus
Ex includes an extension to the basic mover (called DeusExMover, oddly enough)
that allows you to set up cool stuff like locking/unlocking, lockpick strength,
the ability to blow it up, and Nanokeys, among other things. In my opinion,
this is one of the most difficult things to do when you're first starting out,
so be patient. In this lesson, I'm assuming you know how to create rooms and
doorways and how to assign textures to surfaces. If you're at all fuzzy on any
of these, please do all of the items under "The Basics" before doing
this lesson.
It's important to know what a "brush" is and the difference between
the different types. An excellent way to jump-start your knowledge is this
illustration from Wolf's
Basic Tutorial of the various types of brushes and what color they appear
as in UnrealEd. Basically, the first step is to shape the red selector brush
into the shape of your door. A typical door in Deus Ex will be about 128 x 64
x 4. If you have your grid units set to 16, that corresponds to 4 squares wide
and 8 high (and a fraction of a square deep). Once you have your brush shape
defined, move the red selector brush into an empty part of the map. It's important
that it not overlap any existing geometry. Hit the "Add brush to world"
button: ![]() (first
button in the third column).
(first
button in the third column).
IMPORTANT: Do NOT use the scaling tools when making the initial brush. If you do, all sorts of weird things can happen. Though it's a pain, for best results, type in the size values in the selection brush's properties instead.
You will now want to set up the textures for your door. Some good places to start would be the Wood category under the NewYorkCity texture library or the Metal category under Area51 Textures. IMPORTANT: you will NOT be able to change your texture settings once the door is created, so be sure to get it the way to want it. If you don't know how to assign textures to surfaces, you really should go back to the main page and do everything under "The Basics" category first.
The next step will be to make the basic "Addition" brush into a mover
brush - you'll actually be creating a new brush based on the brush you've already
added. To make 100% sure that the selection brush is correct, size the red selection
brush so that it is a bit bigger than the brush you just added. Be sure to check
all 3 2D windows. Hit the intersect button: ![]() (third button down in the third column) and the selection brush will be perfectly
sized to your door brush. In a normal Unreal map, you would just hit the Create
Mover button at this point, but for a Deus Ex mover there is an extra step.
Make sure Classes is selected in the Browse drop-down and expand the following
items: Actor, Brush, and Mover. Select DeusExMover. Now go ahead and press the
Create Mover button:
(third button down in the third column) and the selection brush will be perfectly
sized to your door brush. In a normal Unreal map, you would just hit the Create
Mover button at this point, but for a Deus Ex mover there is an extra step.
Make sure Classes is selected in the Browse drop-down and expand the following
items: Actor, Brush, and Mover. Select DeusExMover. Now go ahead and press the
Create Mover button: ![]() (sixth button down in the third column).
(sixth button down in the third column).
At this point, you will actually have THREE brushes in the same place: the red selection brush, the blue "Addition" brush, and a purple "Mover" brush. Move the red selection brush out of the way, and click on the purple brush to select it. Move it somewhere, and you'll notice that your original brush is still there. De-select the mover brush and select the blue brush. Delete it (either hit the Delete key on the keyboard or right-click and select Delete). Now hit F8 and Rebuild Geometry to get rid of your original brush in the 3D view.
The purple brush that is now in your map will only show up as an empty wireframe. However, it will show up fine when playing the level.
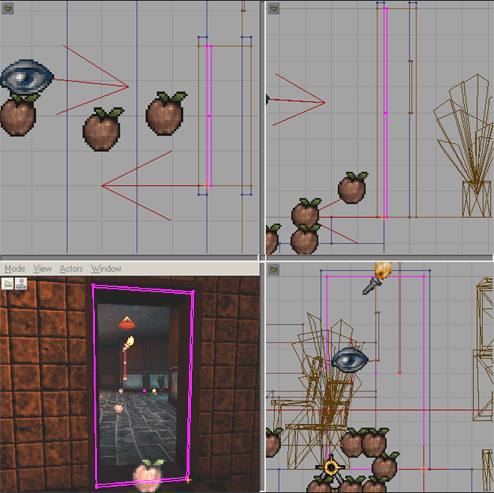
Notice in this example from an actual Deus Ex map how the door appears hollow in UnrealEd. During the game, though, there will be a functioning door there.
NOTE: For some brush tips on stuff like properly placing the pivot point and scaling, see the Brush Tips page.
A mover brush can be moved around at any time, so it is not critical that it be moved into the exact final position yet. Mover brushes are very flexible, so we can make a swinging door, a door that slides from the top/bottom/left/right, an iris-type door - just about anything you want. For this tutorial, let's make a traditional swinging door. I won't go into the basics of creating rooms and doorways here - you should be familiar with that before going on. If you want, move the door into a doorway that you have already created in your map. However, I would recommend that for now you just leave it floating in the air somewhere, but not too far off the ground.
The red arrow that you see coming out of the mover brush indicates the "direction" of the door. That is only important if you want to make it so that the door can only be opened from one side. The direction of the arrow indicates the only side you would be able to open it from if its bOneWay property was set to True. We'll talk about DeusExMover properties more at the end of this lesson.
To actually get a door to move, you will need to set what position the door is closed, and what position it's in open. Typically, the closed position is the "base" or "Key 0" and the open position is "Key 1". Note that you can set up a door to initially be open in your map.
When you created your DeusExMover brush, you also set the position of all eight "key frames." These key frames define what positions your mover brush can be in. For fancier movers, you may end up using more then two key frames, but for doors, you'll usually want to stick with two. Make sure your door is selected (bright purple instead of dark purple) and right-click it. Right-clicking will also select it, so you may want to practice pulling up the right-click menu and selecting in one step. Select Mover Keyframe and then Key 1. You can now move your door into its open position.
Since you're making a swinging door, rotate your mover brush 90 degrees in the Top 2D view by holding down CTRL and right-click and moving the mouse left or right. You may also need to move the door into the correct position, depending on where the pivot point on your DeusExMover brush ended up. There are some techniques for setting up precisely where a pivot point will be created on a mover, but let's not worry about that for now. The one thing you DON'T want to do is move the pivot point after the DeusExMover brush is created. That will mess up your texture scaling.
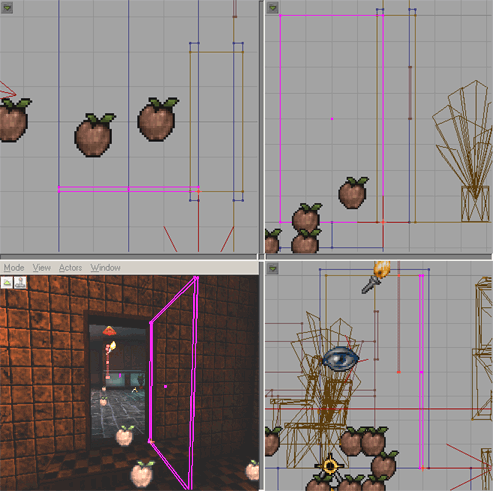
Compare this example to the previous one. This is showing the same mover brush, but at Key 1. Notice how it has been rotated 90 degrees; this is the door's open position.
If you'd like the door to initially be closed, right-click on it and re-select Key 0.
NOTE: If you'd like your DeusExMover to go through more than two keyframes, you can also set up keys 2 and up. For that to work, you'll need to increate the Mover -> NumKeys value from 2 to the number of keys you are using.
Now that the hard part is done (trust me!), we need to set this up so that it acts like a door in Deus Ex. The DeusExMover brush can be used for more than doors (breakable glass and elevators are both subclasses); see EditorDocumentation.doc for more information. We want to create a door, though, so right-click your mover brush and select DeusExMover Properties. Expand the DeusExMover category and set bIsDoor to True.
If you want the door to initially be locked, set bLocked to True. (easy one, eh?)
To make the door accessible from only one direction, set bOneWay to True. The
player will only be able to open the door from the direction of the arrow.
To set the lock strength, set lockStrength to a value. "0.1" would mean 10% lock strength. (a player untrained in lockpicking would require one lockpick to unlock a 10% lock strength door) If you don't want the player to be able to pick the door's lock at all, set bPickable to False.
To set the door's resistance to being blown up, assign a number to the doorStrength
value. "0.25" means 25%. Depending on the value, the player might
be able to destroy the door with a crowbar, a LAM, a GEP gun, or LAW for instance.
If you don't want the player to be able to blow up your door, set bBreakable
to False.
If you would like your door to close without stopping just because the player is in the way (a common setting in the game), expand the Mover item and change MoverEncroachType from ME_StopWhenEncroach to ME_IgnoreWhenEncroach.
You can also set your door up so that it can be unlocked with a key. (novel idea, huh?) First, add a NanoKey item to your map. In the class browser, expand the Inventory, Pickup, and DeusExPickup, and select NanoKey. Add the NanoKey to your map, and assign it a KeyID in its NanoKey properties. (you'll also want to set the Description under Inventory properties, since the player will see this when they pick up the NanoKey) As you might guess, you then just need need to assign the same KeyID value to your door's KeyIDNeeded value. Now, if the player has that key, and they use their nano-keyring on the door, they will be able to unlock it.
Another option is the ability to unlock/lock/open/close your door from a security console (computer). Assign your door a Tag value in its Events property and use this value in one of the doorTag values of a security console. See How to add a security console for details.
There are even more options for how to use doors, so experiment. Have fun!
Extra notes:
You may actually want to use "regular" Unreal movers in your maps
sometimes for doing things other than doors. For more information, see Wolf's
Movers tutorials at Wolf's Unreal.