Prerequisites:
The Basics
Overview:
If you need to show very distant objects in your map, such as stars in the sky,
the sun, the moon, clouds, or distant buildings or mountains, you can set up
a separate zone in your map called a Sky Zone. You may have heard
this zone referred to as a "sky box" since you generally create a
cube for this, but I prefer the term Sky Zone, since it's really just another
type of zone and it doesn't necessarily have to be a cube.
Contents:
What is a Sky Zone?
Add a sky zone to your map (the easy way)
Add a custom sky zone to your map
A Sky Zone is an area outside of your main map that is used to set up decorative elements that appear to be very far away. What does that really mean? It means that, for example, if you had a large subtract brush in your main map (where the player will run around in) that you set up as "the outdoors", you could set the top and side surfaces up as a "fake backdrop". When playing the map, the player would see the surfaces of the Sky Zone instead, but they don't change perspective as the player moves. In other words, those surfaces act like the sky or very distant objects.
Creating a sky zone is quite easy. The only hard part is making it look good!
To create a simple sky zone, create a subtract brush away from the main play area. Add a SkyZoneInfo item inside that brush (available under Actor -> Info -> ZoneInfo). The player will see everything in the Sky Zone from the perspective of the SkyZoneInfo item, so it's usually placed in the center of the zone, fairly close to the ground. Set up any surfaces, lighting, sheet brushes, or any other decorations, to create cloud layers, a moon, or a distant skyline inside the brush. Then just set the properties of any surfaces in the main play area that you want to act like "the sky" or whatever to Fake Backdrop. That's it. I'll cover that in more detail in the tutorials on the rest of this page.
Here are some examples of what they look like in UnrealEd from some real Deus Ex maps:
|
|
|
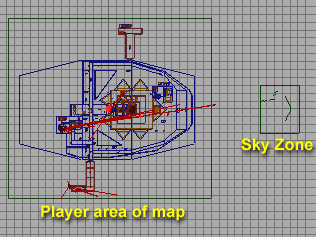
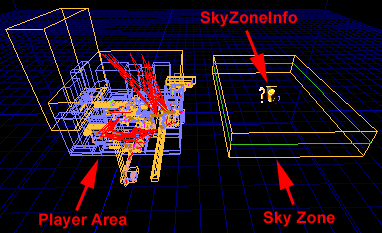
| This is an overhead 2D view of the 01_NYC_UNATCOIsland.dx map from the real game. The area on the left is where the player moves around in, and the area on the right is the Sky Zone. This Sky Zone has a number of 2D sheet brushes in it for the New York City skyline, the moon, and a cloud layer. | This is the 02_NYC_Street.dx map from the real game. The area on the left is where the player moves around in, and the area on the right is the Sky Zone. In this example, the green outline in the Sky Zone is a non-solid sheet brush used to show a cloud layer. The SkyZoneInfo item inside the big subtract brush is what makes it a Sky Zone. |
Overview:
The easiest way to add a good-looking sky zone to your map is to simply steal
one from one of the Deus Ex maps.
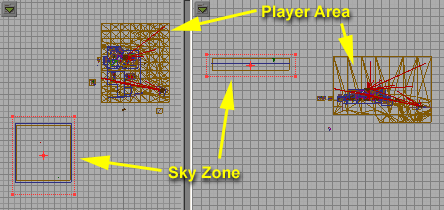
First pull up one of the real Deus Ex maps that has a sky zone you want to steal. For this example, pull up 12_Vandenberg_Cmd.dx (you'll have to enter the whole thing or hit *.dx and enter for the Deus Ex maps to show up when using Open level). The Sky Box in that map has a sunset, some stars, and a cloud layer. Set the red selection brush to a cube if it isn't already and locate the sky zone in the map. Position and size the red brush so that it completely surrounds everything in the sky zone. Make it as big as you want, as long as it doesn't surround anything in the player area.
Be sure that the red brush surrounds the sky zone in all three 2D windows. It should look something like this in the top and side 2D windows in UnrealEd:
Now press the "Select actors inside brush" button. If
you've never used that before, it looks like this: ![]() . It's
quite handy for selecting large areas of a map. The brushes and everything
else inside the red brush should now be selected. Select Copy from
the Edit menu.
. It's
quite handy for selecting large areas of a map. The brushes and everything
else inside the red brush should now be selected. Select Copy from
the Edit menu.
Pull up your map and select Paste from the Edit menu. If the sky zone items are overlapping any part of your map, move everything off to the side. Since you copied EVERYTHING that was part of the other map's sky zone, you also got a SkyZoneInfo item as part of it, so you don't even need to add that.
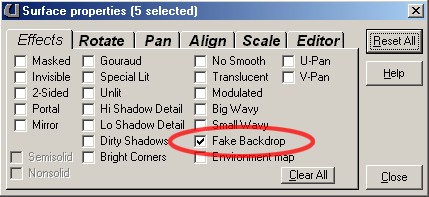
Now all you need to do is set the surfaces in the "Player Area" of your map to Fake Backdrop. Typically, you have a large subtraction brush that all of your level is inside of. Select the top and all four side surfaces of that brush, right-click on one, and pull up Surface Properties. Check "Fake Backdrop".
Rebuild your geometry and you're done!
Overview:
If you'd like to be a little more creative with your sky zone, you can put just
about any decorative items you want in it, and surface and light it however
you please. Also, I'll cover creating a Sky Zone from scratch.
You should already have at least a basic "play area" of a map. Pull
your map up, and create a large subtraction brush off to the side somewhere. The
exact size of this brush or area is up to you, but you can get away with making
it pretty small in reality. This would typically be a cube (hence
the term "sky box"), but it can be whatever you want, as long as it's
sealed off from the rest of the map. Expand Actor -> Info ->
ZoneInfo, select SkyZoneInfo, and add one to your map in the middle of the large
brush you just created. It looks like any other ZoneInfo item in
the editor: ![]() . How
high or low to position it is something you'll have to figure out, depending
on what you're trying to do. Putting it roughly in the middle is
a good starting point.
. How
high or low to position it is something you'll have to figure out, depending
on what you're trying to do. Putting it roughly in the middle is
a good starting point.
NOTE: The sky zone perspective can be rotated by setting the SkyZoneInfo property values under Movement -> Rotation.
This part's up to you, but I'll mention some common techniques. The sky box textures used in the game are in the CoreTexSky texture package.
* There are some notable exceptions, but most of the time you'll set the surfaces inside your Sky Zone to Unlit. That way the surfaces will be completely bright and you won't need to add any lights.
* To create individual elements like the moon, you can use 2D non-solid sheet brushes and assign the texture to it. This works better with masked textures. You can create those types of brushes using the Sheet mode and the Add Special Brush button. A good preset to use in the Add Special Brush window is "Masked Decoration", though I would set Visibility to 2-Sided so that you don't have to worry about which direction the polygons are facing. A complete discussion about 2D brushes and masked textures is beyond the scope of this tutorial though.
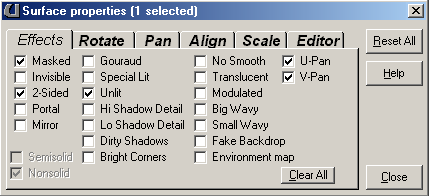
* A common method of creating a cloud layer is to make a large 2D sheet that covers the whole sky zone. If you want the texture on that sheet to move, you can turn on the U-Pan and V-Pan feature on that surface. That just means that the texture will move in both the X and Y directions. Here's an example of how you might set the surface properties of a cloud layer:
(though you actually might instead turn off Unlit and use lights to light the middle of the cloud layer so that the clouds fade to black as they approach the horizon)
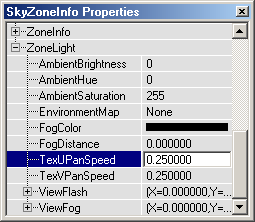
To control the speed that the texture moves, you can set the TexUPanSpeed and TexVPanSpeed values for the whole zone. Since a Sky Zone is, in fact, another zone, you can can values in the SkyZoneInfo item that affect everything in the zone. These two values control how fast ANY textures in the zone will move. You usually only have U-Pan and/or V-Pan turned on for a cloud surface in a sky zone, so that shouldn't be an issue. The default values of 1.00 are pretty fast. I would set these to something like 0.05 for slow moving clouds and maybe 0.25 for faster clouds.
* If you want to get fancy, you could also add other elements like helicopters flying around in the distance or something. You might need to adjust the Display -> DrawScale value to scale it down and use InterpolatonPoints to fly it around. I don't remember anything like that in Deus Ex though.
* If you want to get REALLY creative, you can do stuff like make the main sky
zone brush continuously rotate. Maybe that'd be good for simulating
being on a rotating space station or something.
NOTE: Lens flare effects do NOT work inside of Sky Zones. It sucks, since if you had the sun in a sky zone, it would have been the perfect place for a lens flare. Maybe we'll get that with the Unreal 2 engine?
This is the easy part and works exactly the same as "the easy way." Set the surface properties of any surfaces within your main player area that you want to be drawn as the sky to Fake Backdrop. Rebuild your geometry and you're ready to go.
Here are some other Sky Zone (sky box) tutorials, many of which include more tips and tricks for decorating your sky zone:
http://www.planetdeusex.com/constructor/Tutorials/outdoors/outdoors.htm
http://www.planetunreal.com/uedlab/Tutorials/Decorate_your_sky_zone/decorate_your_sky_zone.html
http://unreal.gamedesign.net/tutorials/7/wolftut7.html
http://www.planetunreal.com/utcity/tutorials/How_to_Create_Skyboxes.html
http://www.planetunreal.com/uedlab/Tutorials/Make_and_understand_a_Sky_Zone/make_and_understand_a_sky_zone.html
http://www.unreal.co.za/shrimp/tutorials/skybox.htm
http://www.gameznet.com/unreal/edsky.html
http://www.planetunreal.com/visions/tutorials/9.htm
http://decyber.com/unreal/build/skyzones.htm