Prerequisites:
The Basics
Some knowledge of 8-bit color palettes
Overview:
You might need to create textures where some of the texture is transparent. Those
are called "masked textures". They can be used on brush surfaces
that are set up as masked, on model surfaces where polygons have been marked
as masked, or for certain HUD elements like belt icons. Creating
Deus Ex compatible masked textures in Photoshop 5.5 or higher is pretty easy.
You'll need to use a unique color to fill in the pixels that you want to be transparent. This part works just like setting up transparent areas of a GIF file, if you've ever done that.
A standard choice for which color to use is purple. That is, the RGB value Red=255, Green=0, Blue=255. You can type those values in the R, G, and B fields of the color picker. The color you choose can be anything you want, but the purple color does tend to stand out and makes it very easy to pick the correct color from the palette in Step 2.
At this stage, it doesn't matter if the image is 24-bit color or 8-bit color.
If you'd like to try this without creating a texture, here's an example. Right-click on this image, save the GIF file somewhere, and pull it up in Photoshop.
![]()
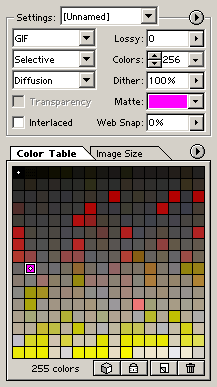
In Photoshop, make sure your image is selected, and choose "Save for Web"
from the File menu. You want to set the file type to GIF (not JPG)
and from the Matte drop-down, select "Eyedropper Color". Click
on the eyedropper tool (looks like this: ![]() ) and click somewhere on your transparent color in the image. You
should see your unique color selected in the color table that Photoshop has
generated.
) and click somewhere on your transparent color in the image. You
should see your unique color selected in the color table that Photoshop has
generated.

Now just hit OK and save your GIF file.
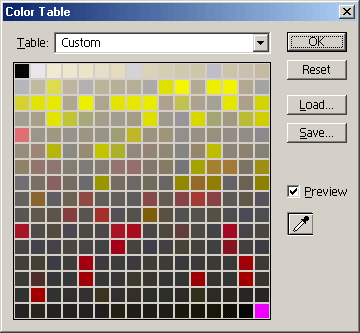
For those that want to know what's going on here, Photoshop will rearrange the colors in the palette so that your transparent color is the *first* color. It turns out that's exactly what you want. The Unreal/Deus Ex engine will use the first color in the palette as the transparent color.
Now pull up the GIF file you saved into Photoshop. Do NOT use the original image that is still open in Photoshop. Select File -> Save As and save the file as a PCX file. That PCX file can now be imported into Deus Ex and used as a masked texture.
If you'd like to check the color palette to see if your transparent color is in the right place, select Image -> Mode -> Color Table while your GIF or PCX file is selected. Your transparent color should be the LAST color displayed. (Photoshop displays the first color last for some reason)

NOTE: If your image has less than 256 colors, your transparent color may not show up in the last square. In that case, things get a little more complicated. You'll need to double-click on the last square and change it to some unique color (purple again is fine). THEN, you'll have to change the other color to something else and use the Fill tool to fill in your transparent areas with the color in the last square. It's difficult to describe, but I hope you know what I mean. If anyone runs into this (I have not), e-mail me and I can improve this section with a better explanation.
If you need to know how to import the texture, see How to add custom textures.
NOTE: If you use method #1 described in the above link, you can check "Masked" when importing the texture or if you use method #2, you can add "FLAGS=2" to the end of the import line. Either of those will default any brush surfaces to "Masked" when the texture is applied. It's not necessary, but it saves a step.