Prerequisites:
The Basics
Overview:
This will show you how to put guards on patrol. It's easy!
Expand Actor -> NavigationPoint, select PatrolPoint, and add one to your
map where you'd like your patrol route to begin. It will look like
this: ![]() in the editor. You
should use the "hold down the 'A' key and left click" method when
adding any type of navigation point to your map. (all of the types of
NavigationPoint's are used to form Unreal "Paths" - it's important
that they all be the same height from the ground) The red arrow coming
out of the PatrolPoint symbol indicates which direction the NPC will face at
that point.
in the editor. You
should use the "hold down the 'A' key and left click" method when
adding any type of navigation point to your map. (all of the types of
NavigationPoint's are used to form Unreal "Paths" - it's important
that they all be the same height from the ground) The red arrow coming
out of the PatrolPoint symbol indicates which direction the NPC will face at
that point.
Pull up its properties and give it a Tag value (under Events). Each PatrolPoint will be linked to another one, so you might want to end the name with "01" or something to indicate that this is the first one.
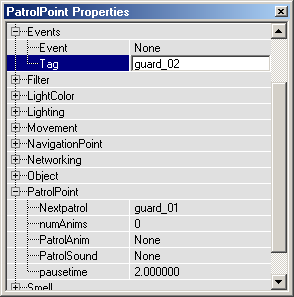
Now expand the PatrolPoint category and fill in the Nextpatrol value with the name of the next patrol point (you'll add that one in the next step). Ending the name with "02" or "2" wouldn't be a bad idea.
You can also specify a pausetime (in seconds) if you want the NPC to pause for a while at this patrol point.
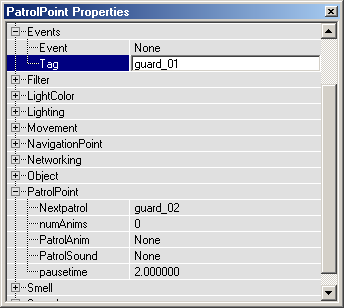
Now place your second patrol point and set its Tag value to the Nextpatrol value you set in Step 1. If you want a third patrol point, set the Nextpatrol point to that, and so on. Most of the time you'll want to set the final Nextpatrol value to the Tag name of your first patrol point to form a loop. That way your guard will continuously walk his patrol route. You can get by with as few as two total patrol points, as in this example.
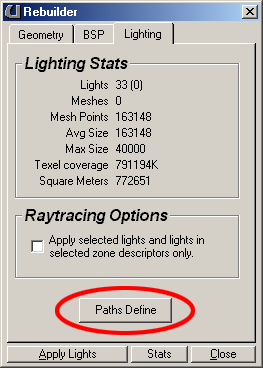
This part isn't too intuitive if you've haven't used "path nodes" yet, but fortunately it's quite easy - it just requires you to push a button. In order for any type of "navigation points" to work, we need to tell UnrealEd to actually build the paths.
NOTE: As mentioned in the SDK docs, navigation points should be less than 700 Unreal units apart and need to be within line-of-sight of each other.
Press F8 to bring up the Rebuilder and go to the Lighting tab. Now just hit the Paths Define button.
To see if your navigation points (in this case, patrol points)
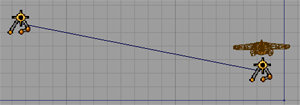
are being properly connected, use the ![]() button in the overhead 2D window to bring down the menu bar and select Show
Paths from the View menu. You should then see a black line connecting
each of your patrol points.
button in the overhead 2D window to bring down the menu bar and select Show
Paths from the View menu. You should then see a black line connecting
each of your patrol points.
Now add your guard. Any NPC under Actor -> Pawn -> ScriptedPawn will do. You can use Soldier under HumanMilitary if you just want a generic guard. Add your NPC near your first patrol point. Pull up its properties and expand the Orders category.
Set the Orders value to Patrolling and the OrderTag value to the Tag name of your first patrol point.
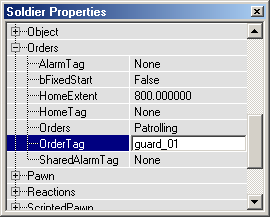
Now when you play your map, the NPC you added should follow your patrol route.