
How to set up Unity for Ouya development
Overview
So you want to publish some Unity games to the wacky open game console known as Ouya (Ooo-ya! Kind of like the Kool-Aid Man from those old commercials). Obviously you'll need Unity installed and obtain an Ouya console. So go do those things if you need to.
Note that this is geared toward those running Unity under Windows 7, though there will be some crossover if you're on Mac.
What You'll Need
Hardware required:
* A PC or Mac to develop on. Duh.
* An Ouya console. It should be near your PC or Mac during development.
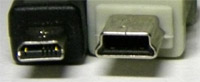
* A micro-USB to USB cable (NOT the more common mini-USB cable). These are around $6 online like Amazon, or $15-$20 at a brick-and-mortar store like Best Buy in the U.S. This is what lets your PC or Mac talk to your Ouya. The Kindle book reader actually uses micro-USB, so you have a cable for that, you can use that one! For reference, the one on the left is a micro-USB and the one on the right is a mini-USB connector:
Be aware that some cameras come with USB cables that sort of look like micro-USB cables, but many of them have proprietary connectors that simply won't work.
Downloads required:
* Unity (you may already have this)
* Android SDK (if you deply Unity projects to Android devices, you likely already have this)
* Additional Android SDK components
* Android Native Development Kit (NDK)
* Java Development Kit (JDK)
* Ouya Unity Plug-in/Samples
1. Sign up for Ouya developer account
This step's easy. If you already have an Ouya set up, you already have an account. You can make your existing account into a developer account by going here:
That's the same address you see if you go into the MAKE menu on your Ouya. Click one of the links and you'll be asked if you want to make your account into a developer account. The correct answer is "Yes."
To complete your developer account setup, fill in the required sections and agree to the terms. You can input a bank routing number and account number so that Ouya can pay you, if you have any players that purchase your content. You can also print out and sign a W-9 form for tax purposes if you live in the U.S., then submit the scanned-in form as a PDF.
When you complete the process, you'll get a unique identifier that's a long sequence of numbers and letters called a Developer UUID. UUID means Universally Unique Identifier.
2. Download the Ouya Unity plug-in, and the Java Development Kit (JDK), Android SDK, and Android NDK
* Download the 25 MB Ouya Unity plug-in and samples here (hit the "Download ZIP" button at the lower-right of the page):
https://github.com/ouya/ouya-unity-plugin
The download from GitHub was very slow for me, so you may need to be patient.
* Download the Java Development Kit:
http://www.oracle.com/technetwork/java/javase/downloads/index.html
The Ouya documentation says to use a 32-bit version of JDK 1.6. From what I can gather, if you're running a recent Unity 4.x version, you can go ahead and install JDK 1.7. This part is very confusing, since 1.6 is described as "Development Kit 6u43" and 1.7 is described as "Development Kit 7" (or more specifically at the time of this writing, Development Kit 7u25). Huh?
I chose the "Windows x86" version on the JDK 7 page, which was an 89 MB file. Remember to click the "Accept License Agreement" radio button first. Luckily the Oracle site is smoking fast - no waiting this time!
A more conservative option would be to download JDK 1.6 from here:
http://www.oracle.com/technetwork/java/javase/archive-139210.html
Side note: you'll eventually end up at the above link if you hit the "Download JDK 6 32-bit" button in the Ouya Panel within Unity. We're getting ahead of ourselves here, but when you later see that button, you'll know what that's all about.
* Download the Android SDK, if you don't already have it installed:
http://developer.android.com/sdk/index.html
Go ahead and install it.
* Download the Android NDK:
http://developer.android.com/tools/sdk/ndk/index.html
I chose the Window 32-bit one, even though I'm running Windows 7 64-bit. I believe you want 32-bit for all of this stuff. This was a 414 MB file, but it was a very quick download, I guess since it's right off the Android developer site.
3. Set up your PC or Mac to talk to the Ouya
I had a 22" LCD TV in my bedroom that I never watch, so I grabbed it, set it up right next to my computer monitor, and hooked my Ouya to it. If you can manage a similar setup, it'll make things a lot easier, since you'll be dealing with a wired connection from your PC to your Ouya. So if you have an extra TV (or monitor that has sound) and an HDMI input and you can put it near your PC or Mac, that'll make things a lot easier.
The connection between your Ouya console and PC or Mac running Unity will be a wired USB connection. If you've deployed to Android devices before, you may be familiar with this. I believe Unity uses a utility in the Android SDK called Android Debugging Bridge or "ADB" to deploy projects to Android devices. In order for ADB to "see" an Android device, you'll need to install a driver.
I was already familiar with this step since I had set up a Nook HD+ Android tablet first with stock firmware, then again with custom firmware. In Windows, basically what you have to do is customize an INF file (a text file) so that it includes the Vendor ID of the device you want to set up. Yeah, it's a royal pain. It looks like it's a bit easier on a Mac. For more info on Mac setup, see the official docs here:
https://devs.ouya.tv/developers/docs/setup
The Windows Android SDK includes a Windows USB driver for Android devices. For me, it was in the SDK folder under /extras/google/usb_driver/. One of the files that's part of the driver is called android_winusb.inf.
Pull up the android_winusb.inf file in Notepad or your favorite text editor, and add this section to both the [Google.NTx86] and the [Google.NTamd64] sections:
;OUYA Console
%SingleAdbInterface% = USB_Install, USB\VID_2836&PID_0010
%CompositeAdbInterface% = USB_Install, USB\VID_2836&PID_0010&MI_01
On a side note, this means that the Ouya has a Vendor ID of 2836 (in hex).
OK, go ahead and plug the micro-USB side of your cable into the Ouya and the full-sized end into your PC or Mac. On PC, in Windows, you should see this in Device Manager:
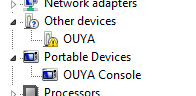
Windows will see the Ouya's internal storage like it's a phone, tablet, camera, music player, etc. It uses the Media Transfer Protocol (MTP) for that, so you'll see a new "Eject MTP" option in your Safely Remove Hardware list. You can see the APK (Android Package) files of any games you've downloaded in the root of the drive letter that Windows assigns. That's nice and all, but we need Windows to also recognize the Ouya as an ADB device, not just a storage device.
So in Device Manager, right-click on OUYA under "Other devices" and select Update Driver Software. Select "Browse my computer for driver software", then navigate to the folder containing the INF file that you customized. Hit Next. You'll get this lovely dialog box:
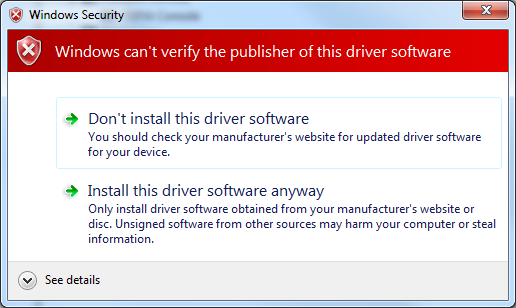
Go ahead and hit "Install this driver software anyway." That's really comforting, right? That's just how it works. After a minute or so, the driver installation should finish. If it worked properly, you will be rewarded with this new device in Device Manager:
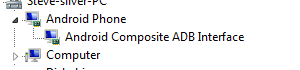
Trust me when I say that this is a glorious sight. Windows and your Ouya will now be able to talk via ADB! I knew we just needed to get those two together and they'd hit it off.
NOTE: In order to be able to run ADB.EXE from any folder in a command prompt, you'll want to add the full path to your PATH environnment variable in Windows. Google it for more info, as that is beyond the scope of this tutorial.
Now fire up a Command Prompt as administrator and type in these four commands:
adb kill-server
echo 0x2836 >> "%USERPROFILE%\.android\adb_usb.ini"
adb start-server
adb devices
If you see some random letters and numbers followed by the word "device" under "List of devices attached", that's really, really good news. Android Debugging Bridge is talking to your Ouya. Congrats! Now Unity will be able to "see" your Ouya, though there's still some stuff to configure for builds to actually work.
Here's what mine looks like after typing "adb devices" in a command window. I blurred out part of what I got, since I assume it's unique to my Ouya, and I don't feel like over-sharing:
![]()
The Ouya itself will also show you that it's hooked up to your PC as a media device and that USB debugging is connected. On your Ouya, go to MANAGE -> NOTIFICATIONS, and check it out if you want:
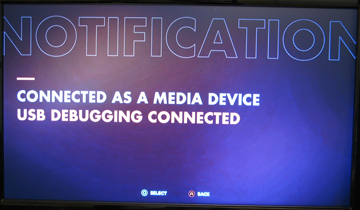
Selecting those will bring you to options related to USB connectivity and debugging, but you shouldn't have to mess with the settings.
4. Configure the Android SDK
Even if you already deploy to Android devices, you may need to set up some more stuff in the Android SDK. If you don't have the Android SDK installed at all, now is the time.
In my case, I had already been messing around with deploying to an Android tablet, so I needed to pull up the SDK Manager that was part of my existing Android SDK installation. You'll still need to do this if you have a new Android SDK installation. Under your Android SDK folder you should have a file "SDK Manager.exe." I right-clicked and ran as administrator.
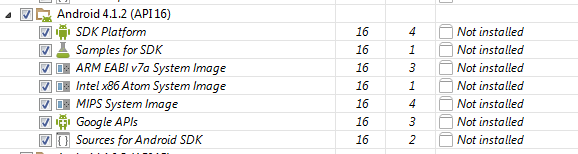
Check the "Android 4.1.2 (API 16)" item if the components are not installed:
Check the"Android Support Library" item under Extras if not installed:

I did not have Android 4.1.2 stuff installed, but I did have the Android Support Library installed. So click what you need to (if anything) and hit the "Install X packages..." button. The number of packages you need may vary from what I needed.
![]()
Hit the "Accept License" radio button, then hit Install. The components will download and install. Took a couple of minutes for me.
I had to take one extra step, which was super annoying. The Ouya Unity plug-in assumes a particular path to a tool called AAPT (Android Asset Packing Tool). Unfortunately if you have a newer version of the Android SDK than what it expects, it won't be able to find it. All I did was copy aapt.exe in my Android SDK to where it wanted it. You may not need to do this, but I made a copy of my aapt.exe from here:
\build-tools\android-4.2.2
To here:
\platform-tools
Kind of cheesy, yeah, but you gotta do what you gotta do.
5. Install the Java Development Kit (JDK)
If you don't already have the JDK installed (I didn't), go ahead and install it now. My installer was called jdk-7u25-windows-i586.exe, which is JDK 1.7. Yours may be called something else, and certainly will if you chose to download JDK 1.6.
I ran the EXE as administrator just in case that was needed. I took all of the defaults. You can skip the "Next Steps" button at the end of the installation and just hit Close.
6. Install the Android Native Development Kit (NDK)
Go ahead and install the Android NDK if you haven't already.
7. Open up the sample Unity project included with the plug-in
The Unity plug-in and samples ZIP file includes a document named OUYA_Unity_Package.docx written by Tim Graupmann, which contains instructions on getting projects deployed to the Ouya from Unity. It's the same content as this page:
https://devs.ouya.tv/developers/docs/unity
Right off the bat, I found the instructions confusing. The very first YouTube video says to open up a Unity package in a "Packages" folder from the Ouya Development Kit (ODK), rather than the Unity plug-in and samples. I initially downloaded the ODK, but it didn't have such a folder. What you really want to do is unzip the plug-in and samples ZIP file, then open up the contents as a Unity project. So fire up Unity and select File -> Open Project. Then navigate to the top level from the zip (a folder called "ouya-unity-plugin-master"). Apparently the plug-in contains files in Unity 3.x format. Since I'm running 4.x, Unity asked if I wanted to convert, so I said "yes."
You should see your project hierarchy look like this in Unity:
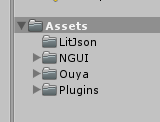
LitJson is a JSON parsing library. I guess some of the sample scenes use that.
NGUI you may be familiar with. It's a popular commercial add-on for building UI's that the sample scenes use.
The Ouya folder contains all of the sample assets themselves as well as some Ouya-specific Unity scripts.
The Plugins folder contains more of the actual "glue" to integrate with Ouya.
An interesting first scene to check out in the project is SceneShowUnityInput under Ouya/Examples/Scenes. It shows what buttons and axes are which for whatever controllers are paired to your Ouya. We're going to deploy that to your Ouya in a couple more steps.
First, make sure your API level is set correctly. Mine already was, so you may not have to do anything. To check it, go to Edit -> Project Settings -> Player and expand "Other Settings."
In the Identification section, check the Minimum API Level setting.
Since the Ouya 1 is built on Android 4.1, set the Minimum API Level to 16. For some reason, the official Ouya documentation mentioned earlier shows 14 in the screenshot. But no, you want to select "Android 4.1 'Jelly Bean' (API level 16)" like this, if it isn't already selected:
![]()
While you're at it, go ahead and fill in a Company Name and Product Name up top. The Product Name will show up as the name of the game in the Ouya's PLAY menu.
8. Configure JDK in Unity (if necessary) and check all SDK paths
In Unity, you should have an "Open Ouya Panel" item in the Window menu. Select it to pull up the Ouya Panel.
Click on each of the top buttons: Unity, Java JDK, Android SDK, and Android NDK. If any of the paths are grayed out, you'll need to fix them. When I set this up, my Java JDK paths were all gray; it looks for the default JDK 1.6 path.
So if you went the safe route and installed JDK 1.6, you may not have to do any JDK configuration. If you were all aggro like me and went for JDK 1.7, the paths will be grayed out, so you'll have to manually navigate to the SDK. Hit the "Select SDK Path.." button and navigate to your rebellious SDK location. On my machine, it was C:\Program Files (x86)\Java\jdk1.7.0_25\.
Important note: There are all kinds of interesting-looking build buttons in the Ouya Panel. I don't have Pro yet, so I got the message "Building Player from editor scripts requires Unity PRO." The "pro" was in all caps, just to put me in my place!
9. Deploy a sample game to your Ouya
Pull up File -> Build Settings and include just the SceneShowUnityInput scene.
Unless you're very new to Unity, you already know how to build and deploy. Just make sure Android is selected, hit Build and Run, and pick a name and place for the APK (Android Package) to be output. After a few minutes, you should see this on your Ouya:
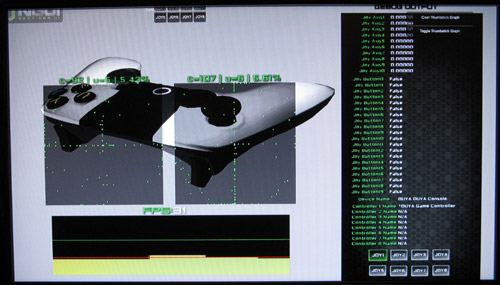
YES! Yep, that's one ugly screen. Pretty useful for checking out gamepad mappings though. This will show PS3 and Xbox 360, etc controllers too. Oh yeah, and congratulations if you made it this far. You have taken your first step into a larger world. Or something.
Notice that your brand new APK now shows up in the Ouya's PLAY menu along with any games you've downloaded:
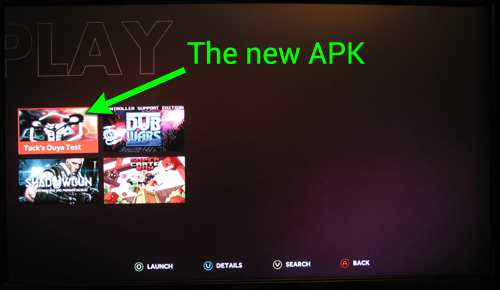
The icon (if you don't change it) will be the default ouya_icon.png in the /ouya-unity-plugin-master/Assets/Plugins/Android/res/drawable-xhdpi/ folder. To change it, just overwrite that PNG file with your own 732 x 412 image. We'll go ahead and do that in the next tutorial, which will cover deploying your own Unity game from scratch.
OK then, next we'll see how to deploy your own Unity game without all of the baggage of the sample project.
Proceed to How to deploy your own Unity games to Ouya