Prerequisites:
The Basics
How to add custom packages
Installation of the Team UC Mod Loader
Overview:
A common question that comes up is: "Can I change the player's character
to look like someone else?" The answer is "Yes". The
way you do it is by setting up a custom player class and specifying a different
model or skins in that class. Custom player classes let you do other
things too, but those types of things typically require some coding knowledge. This
tutorial covers how to use custom player classes with the Team UC Mod Loader
and includes an example player class file, an example map, and an example Mod
Loader .int file.
Download:
Download example files (5K)
You will need to compile the included .uc file into a package before the example
will work. Be sure to unzip the files into the corresponding folders
as stored in the zip file.
For this tutorial, you'll need to install the Team UC Mod Loader. For more information, see my Team UC Mod Loader tutorial.
If you haven't done so already, you'll need to add this line to the [Editor.EditorEngine] section of your DeusEx.ini file (which is in your \DeusEx\System folder):
EditPackages=DeusExML
Be sure to add it before any EditPackages lines that you've added previously. That line is not needed to simply use the mod loader, but it is needed when compiling new code that references stuff in the mod loader code.
You'll need to create a .uc file in your \DeusEx\MyPackage\Classes folder (where MyPackage is the name of your package) to define your custom player class. In this example, the file would be called LeroyBrownPlayer.uc. If you aren't into coding, don't worry about it - just use this as an example of what to put in the file and you should be fine:
//=============================================================================
// LeroyBrownPlayer.
//=============================================================================
class LeroyBrownPlayer extends MLPlayer;
event TravelPostAccept()
{
Super.TravelPostAccept();
MultiSkins[0]
= Texture'DeusExCharacters.Skins.ThugMaleTex0';
MultiSkins[3] = Texture'DeusExCharacters.Skins.ThugMaleTex0';
}
defaultproperties
{
CarcassType=Class'DeusEx.ThugMaleCarcass'
Mesh=LodMesh'DeusExCharacters.GM_Trench'
MultiSkins(0)=Texture'DeusExCharacters.Skins.ThugMaleTex0'
MultiSkins(1)=Texture'DeusExCharacters.Skins.ThugMaleTex2'
MultiSkins(2)=Texture'DeusExCharacters.Skins.ThugMaleTex3'
MultiSkins(3)=Texture'DeusExCharacters.Skins.ThugMaleTex0'
MultiSkins(4)=Texture'DeusExCharacters.Skins.ThugMaleTex1'
MultiSkins(5)=Texture'DeusExItems.Skins.PinkMaskTex'
MultiSkins(6)=Texture'DeusExItems.Skins.GrayMaskTex'
MultiSkins(7)=Texture'DeusExItems.Skins.BlackMaskTex'
BindName="LeroyBrown"
TruePlayerName="Leroy Brown"
FamiliarName="Leroy Brown"
UnfamiliarName="Leroy Brown"
}
Save this in your \DeusEx\MyPackage\Classes folder as LeroyBrownPlayer.uc. If you're using the example files "as is", you'll want to add an EditPackages=MyPackage line to the [Editor.EditorEngine] section of your DeusEx.ini file. You should already be familiar with setting up custom packages before continuing.
In this case, Mesh=LodMesh'DeusExCharacters.GM_Trench' is redundant, since the base class is already set to that mesh. So what does that mean? GM_Trench is the model (mesh) that several characters use, including JC Denton. By specifying different MultiSkins values though, different character textures (skins) will be applied.
You'll need to set the 0 and 3 MultiSkins values in the TravelPostAccept function as shown above. It has to do with the custom skins that you select at the beginning of a game. If you know a bit about coding, you can even set it up so that the player can pick a custom portrait at the start of your mod and then set the appropriate skin in that function.
So... how exactly do you set the model and skins to a particular character from the game? To find out which values to set, pull up that NPC's player class. If you've never done an "Export All" in UnrealEd, pull it up and push that button. That exports all of the UnrealScript code into various folders under your \DeusEx folder. If you look under \DeusEx\Classes\Classes, you'll see a *bunch* of .uc files. Pull up the .uc file for the character you want the player to look like, and set the same Mesh and MultiSkins values. For example, pull up ThugMale.uc and you'll see where I got the above settings.
You can also set any of the MultiSkins values to your own custom-made textures. And if you're *really* hard core, you could even use your own character mesh, but that would be a huge amount of work.
NOTE: Not all character models have as much animation as GM_Trench. That
doesn't seem to cause any problems, but it can look weird.
NOTE: You'll also want to change the CarcassType to an appropriate class, so that the correct mesh and textures are displayed on the player when dead. If you're using your own custom skins, see How to re-skin character meshes for more info on carcass classes.
Now just do your "ucc make" to build your new player class into your package. But you're not done yet. You have a new player class, but you haven't told the game engine to use it. Read on.
Create a new text file with a .int extension and save it in your \DeusEx\System folder. The one included in the example files is called CustomPlayerTutorial.int. Type this in, but replace the appropriate items as needed:
[Public]
Object=(Name="Custom Player Test", Class=Class, MetaClass=DeusExML.MLGameInfo,
Description="Class=MyPackage.LeroyBrownPlayer; Map=CustomPlayerTutorial.dx")
For more detailed info on setting up .int files for the Team UC Mod Loader, click here.
That's it. Fire up Deus Ex and select "Custom Player Test" or whatever you put in your .int file.
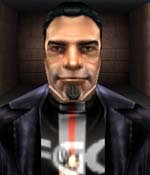
If you're trying it with the example files, you'll be in a hallway with a mirror at the end. If you look in the mirror, you'll see this lovely mug staring back at you: