Prerequisites:
How to add an elevator, Part 1
Overview:
As you can guess, this tutorial continues where Part 1 left off. In
this one, you'll add doors and call buttons at each floor, which is quite easy
using the Carone Elevator mod.
Adding buttons at each floor to request the elevator is easy. Add a Button1 somewhere on the wall of your first floor room. Set it's Event value to the name of your first floor CESequenceEvent, such as ElevatorA_Floor1. You don't want to set its AttachTag, since you don't want it to move with the elevator. You may want to leave its ButtonType as BT_Blank for a blank button, or set it to the appropriate arrow if you've only got two floors.
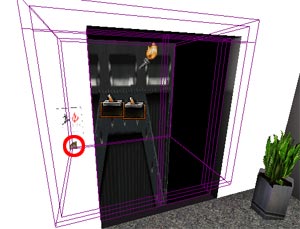
If you're unclear on the typical placement of this type of button, in the picture below I've put a red circle around the one I used in the test map for this tutorial:
Now add another Button1 at the equivalent location at your second floor and set its Event to ElevatorA_Floor2 (or whatever you called your second floor CESequenceEvent). Repeat this for any additional floors you have.
Go ahead and try it out if you want. You may want to put your PlayerStart at a floor where the elevator does not start at, or add stairs or something to get to a floor where the elevator is not at.
The Carone Elevator mod includes the ability to automatically control a door (or set of doors) at each floor. All you have to do is create the door brushes, position their key frames, and set some properties.
In order for this to work, you'll need to create your doors as CEDoor mover brushes. Go ahead and create your Addition brush and texture it. If you've been following the values in Part 1, these dimensions will create a door half the size of the elevator doorway:
So you could have a pair of these that move inward to work like a typical pair of elevator doors.
At this point, you should be familiar with how to create a mover, so go ahead and do your intersection. Before hitting the Create Mover button, expand Actor -> Brush -> Mover -> DeusExMover and select CEDoor. That's a special Carone mover specifically designed to work with CaroneElevator's.
Once you have your mover, you can duplicate it however many times you need to. The idea is to have a set of doors at each floor that operate the same way. Be sure to give each door a Tag value. Each brush or set of brushes at each floor should have the same Tag value. So for the doors at your first floor, you might call them ElevatorA_floor1_outerdoors and so on. The reason I put "outerdoors" at the end of the name is to differentiate them from your inner doors, if you add those later. Inner doors are discussed in Part 3.
Move all of your doors into their closed position. Don't forget to create subtract brushes to give the doors somewhere to move to, if there are solid areas where the doors will go when opened.
Right-click on a door and select Mover Keyframe -> Key 1. Move it into its open position. You'll most likely want to go ahead and select Mover Keyframe -> Key 0 so that the door starts out as closed. Repeat this for every CEDoor you added.
The hard part's done; now it's just a matter of setting up some properties on your elevator brush.
Pull up the properties of your CaroneElevator mover and expand CaroneElevator -> CEEvents. Each one corresponds to a key frame of your elevator. So set [0] to the name of your first floor doors, [1] to the name of your second floor doors, etc.
Also, expand CElevatorAdvanced and set bCEControlsDoors to True so that your elevator will interact appropriately with your doors.
Hit F8, Rebuild Geometry, and give it a try.
In Part 3, you'll add inner doors and an interior open/close button.