
Prerequisites:
The Basics
How to add custom packages
Overview:
I haven't focused much on programming (coding) UnrealScript on this site, but
I got a request to cover something that I would consider a good introductory
topic. Things that the player can pick up and put into their inventory,
use, or drop are called "pickups." You can create your own custom
pickups by creating a custom "class."
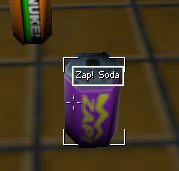
In this example, I'll step you through creating a custom pickup class: a can of Zap! soda. It's 50% more powerful than Nuke! And don't forget, Diet Zap! takes just like regular Zap. :)
Download:
Example files (5K)
First, you will need to have your own custom package set up. If you don't, click here for instructions.
You'll need to make a file to contain the source code of your new class. You can use Notepad or any text editor that can write out plain old text files. Some folks like to use a tool called WOTgreal for UnrealScript editing, but I just use Notepad myself.
Create a text file in your \DeusEx\MyPackage\Classes folder called ZapSodaCan.uc, where "MyPackage" is the name of, well, whatever your custom package is named.
It is *crucial* that you have the file extension .uc at the end. The Unreal compiler will never attempt to compile it otherwise. If you have your Windows environment set up to hide file extensions, you may end up with a file called ZapSodaCan.uc.txt or something and not realize it. I would recommend that you set up Windows to *show* file extensions. For more info on that (or creating classes in general), I recommend the excellent Creating Packages and Classes tutorial over at Universal Constructor.
You never really write an UnrealScript program from scratch. You always "inherit" from an existing class. What the heck does *that* mean, you ask? Well a "class" in terms of the Unreal engine is typically an Actor, which is kind of like a template for a thing you can drop into a map. You know, it's all that junk listed in the Class browser. (that's why it's called the Class browser!)
To "inherit" from a class means that you want to use aspects of another class that's already been written without writing the code yourself. Most of the time you just want to change some properties or do things just a little differently. For instance, there's a class called DeusExPickup that handles all of the common stuff like what happens when the player picks the item up, uses it, or drops it. If you created a class that was inherited from DeusExPickup, you'd get all of that basic behavior automatically.
In object-oriented terminology, when you plop an Actor into a map, you're telling the game engine that when the level starts, it should create an "instance" of a particular class. But don't worry about that too much!
OK, time to start typing. It's optional, but you might want to have some comments at the top describing what your class is. It's also a good idea to put comments above any section of code that is the least bit significant. Making changes later will be a LOT easier, trust me! Comments are ignored by the compiler.
To put a comment line in your code, put two slashes in front of the line. Type something like this in for a comment:
//=============================================================================
// ZapSodaCan - a can of Zap! cola. Heals 3 points instead of the measly
// 2 points that Nuke! heals.
//=============================================================================
Now we want to set up the name of the class and what class it's inherited from. The class name after the keyword "extends" is the class you are inheriting from, sometimes referred to as the "base" class. So type this:
NOTE: The keyword "expands" can be used instead of "extends" - they both do exactly the same thing.
Don't worry about the content of this next part too much. I copied this part from the Sodacan.uc file, which is the source code for the normal Deus Ex soda can. The only change I made was to have it heal three points of health instead of two. The important thing to get out of this part is that we're "overriding" the Activated state. There's a existing state called Activated in one of our ancestor classes, so we're going to replace it with our own. This is the only actual "code" in this file. Code is where you change *how* things work. If you wanted to heal two points like a normal soda can, you could leave this entire section out. Type this:
This last part is often the only thing you'll have in a class. It defines the default properties. They are the "default" values that get assigned when you first plop something into a map. But in the map editor you can change many of them, depending on how the variables are initially declared. (you don't have to worry about that in this example) Type this:
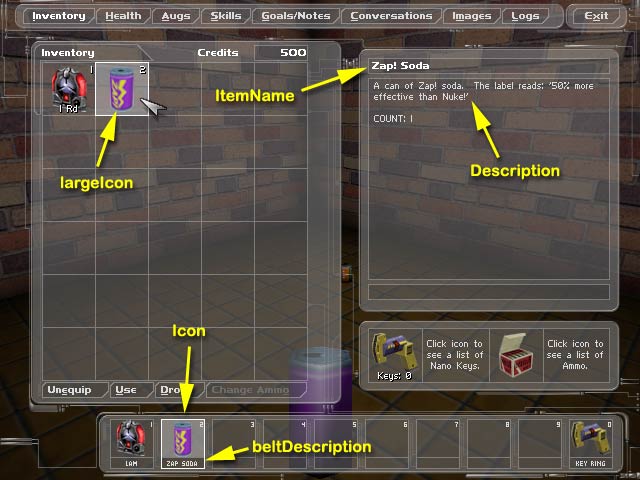
That's it for the basic coding. The ItemName is what appears when the player is near the item and is pointing at it and also shows up other places. The Description is the text that is displayed when the player clicks on the item on the inventory screen. beltDescription is what's shown under the item on the belt inventory at the bottom of the screen. Don't make it too long or it won't fit.
The final line is what makes it look like a can of "Zap!" instead of "Nuke!" Every mesh (model) in the game has at least one surface and each surface is assigned one texture. The soda can model only has one surface and we can override which texture is assigned to it with the Multiskins property. The Deus Ex artists created three alternate soda can textures which were never used in the original game, one of which is for Zap! soda (called SodacanTex2).
If you have a custom mesh that you'd like to use, or just want to use a different mesh built into the game, you can set the PlayerViewMesh, PickupViewMesh, ThirdPersonMesh, and Mesh properties.
If you haven't already done so, be sure to save the file!
To do a pickup properly, you'll want to create icons for it that show up in the game's user interface (UI). How exactly you go about that is beyond the scope of this tutorial. You could draw them by hand in a paint program, render them using a 3D tool like 3D Studio Max or Lightwave, or possibly even get some usable images from in-game screen shots. These icons aren't necessary - they're just cosmetic.
You will need to make the icons "masked textures" in order to mask out the pixels surrounding the object. For more information on creating masked textures see How to create masked textures. Here's what I came up with by rendering the Zap! soda can in Lightwave:
|
For a more professional look, you would ideally have one of those aliens known as "artists" manually touch them up a lot in Photoshop.
The smaller one on the left is for the "belt" icon that's shown in the inventory strip at the bottom of the screen. It's a 64 x 64 texture, but you don't want to use the whole thing or your icon will overlap parts of the UI. If the object is a weapon, this picture will also show up in the "ammo count" part of the display.
The larger one is shown in the main inventory window and can be trickier in some cases. Our soda can is easy, since it just takes up one inventory slot, but you may want a different type of item to take up more inventory slots and in a certain "shape." The one in this example is a 32 x 64 texture and again, you don't want to use the entire area, or you'll partially overlap the inventory grid, which will look bad. (it's OK to completely take up multiple inventory slots, but that's not what we want here)
You define that shape with two more properties: largeIconWidth and largeIconHeight. We don't need to override those in this case, since we can use the values that are inherited from the Sodacan class. It wouldn't hurt anything to set them in our class as well, but sometimes it's better not to clutter up the code if you don't have to. We could have put these two lines in our default properties section of the ZapSodaCan.uc file:
Once you have your textures created, you'll need to import them by using either a separate class file, or by putting the texture import lines in the same file. (you can also reference textures you've imported into .utx files) For more information on importing textures, see How to add custom textures. In the example files that you can download, I used two separate files. If you start having a lot of textures, sometimes it can be easier to keep track of with that method.
Add these lines in the default properties section of the ZapSodaCan.uc file to point to your custom icons:
Again, you would type your package name instead of "MyPackage."
I created a folder under my \DeusEx\MyPackage folder called Textures for storing the textures. These two lines will import the textures from there. I could have put them in ZapSodaCan.uc, but I decided to put them in a separate class called ImportTextures.uc:
This step should be nothing new if you've ever compiled a package. Basically, you want to pull up a command prompt (a.k.a. "DOS prompt") and "cd" to your \DeusEx\System folder. If you're running UnrealEd, exit it now. If you've ever built your package before, you'll need to delete it or the compiler will not attempt to compile it. So "del MyPackage.u" is what we'll do in this example.
Then type "ucc make." I usually like to direct the output to a file by typing "ucc make > out.txt" (it can be helpful when there are a lot of errors).
Notice that no activity has happened in any of the other packages. That's because I didn't delete them.
If your compile worked, then it's time to put some Zap! soda cans in a map. Fire up UnrealEd and you should see your new class show up in the Class browser. It'll be under Sodacan, like this:
Notice that when you have a class selected, UnrealEd will show you which package it's in. So you should see your package name in front of "ZapSodaCan." At this point, UnrealEd is getting the ZapSodaCan class out of your compiled package - in this case it's the MyPackage.u file in my \DeusEx\System folder.
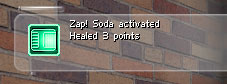
Go ahead and add one or more to a map, play the map, and grab some ice cold Zap! soda. Refreshing isn't it? To test that it heals three points, I put a LAM in a test map and blew it up near me so that my health was lowered first. (if you're at 100% health, it'll say "Healed 0 points")
The ItemName property shows up in a few places, such as when you've highlighted the item, in the message area when you pick it up, drop it, or use it, and in the inventory screen if the item is selected:
 |
 |
Here's a visual breakdown of the various properties that we've set:
I haven't really touched on how you get a completely custom pickup to do what you want it to do. That's because UnrealScript is so flexible, you can do just about anything. If you're interested in learning UnrealScript, I'd suggest digging into the source code for the existing classes and experimenting a LOT.
TIP: If you've never done so, in UnrealEd, hit the Export All button in the Class browser. That will export all of the source code into folders under your \DeusEx folder by package name. (it could take a few minutes!) The most interesting package is called DeusEx. It contains all of the decorations, pickups, weapons, and NPC's among other things. Once you've exported the code, go to your \DeusEx\DeusEx\Classes folder and start poking around. I wouldn't recommend editing any of those files, since it could be confusing and you typically wouldn't be rebuilding the DeusEx.u package (if you screw it up, Deus Ex will become unplayable) I'd recommend doing all of your coding experiments in your own package.
NOTE: The existing vending machine is hard-coded to create a "Sodacan" (Nuke! soda) object if it's set to "drink" mode. An interesting exercise might be to create your own vending machine class that dispensed Zap sodas instead. Since they heal better, you might want to charge three credits instead of two!
Have fun!