Prerequisites:
The Basics
How to add water
Summary:
If you want to do stuff like define water areas, mess with gravity, and add
fog, you can define "zones" in your map using Zone Portals and use
the ZoneInfo actor to set up what special behavior you want in each zone. Water
zones, sky zones, and pain
zones are covered specifically in other tutorials, so this one will cover
some of the less common things you can do. To set up the behavior
of a zone, you just change the properties of its ZoneInfo.
Download example map (19K), unzip and copy to your \DeusEx\Maps folder
The first step is to determine where your special zone is going to be. You'll need to either create new geometry for the zone, or find an existing location. Your zone will need to be "sealed off" with special 2D brushes called Zone Portals in the next step, so think about how you want to seal off your zone.
Here are some of the things you can do:
* Raise or lower the gravity
* Lower the ground friction to make the floor slippery
* Change the ambient lighting
* Create foggy areas
* Create areas that push the player along (to simulate a windy tunnel perhaps)
* Create water
* Change the speed of texture panning
* Create "pain zones"
Change the red selection brush to a 2D sheet by pressing the Build a Sheet
button: ![]() (bottom
button in the third column). Right-click on it and select Sheet Properties.
Make sure "X-Wall" or "Y-Wall" is selected if you
have normal upright doorways, and enter size values that will exactly match
the width and height of your doorway or other opening. (count grid squares if
you have to) If you're creating a Zone Portal to create a large water
surface, you don't necessarily have to be that precise. Now move
the sheet brush so that it exactly covers your doorway or other opening.
(bottom
button in the third column). Right-click on it and select Sheet Properties.
Make sure "X-Wall" or "Y-Wall" is selected if you
have normal upright doorways, and enter size values that will exactly match
the width and height of your doorway or other opening. (count grid squares if
you have to) If you're creating a Zone Portal to create a large water
surface, you don't necessarily have to be that precise. Now move
the sheet brush so that it exactly covers your doorway or other opening.
Push the Special Brush button: ![]() (fifth button down in the third column). Select "Zone Portal"
from the drop-down list:
(fifth button down in the third column). Select "Zone Portal"
from the drop-down list:
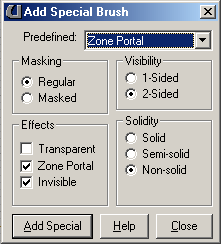
Hit "Add Special", and you should get a brand new green brush exactly covering your opening.
Repeat this step for any openings in your room that lead to areas outside your zone.
Now hit F8 and Rebuild Geometry. If you've done Step 2 correctly, you will have a new zone. On the Rebuilder window, you should see the Zones value increase (should be at least one higher).
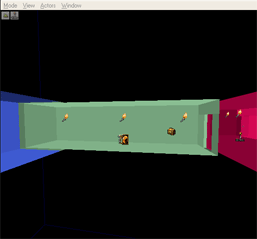
In the 3D view, click the little arrow button to bring down the menu bar. (it
looks like this: ![]() ) Select Zone/Portal View from the Mode menu. You are now seeing
the zones in your map color-coded. In this example, this green hallway
has been "zoned":
) Select Zone/Portal View from the Mode menu. You are now seeing
the zones in your map color-coded. In this example, this green hallway
has been "zoned":
Make sure your zone is a different color from the areas next to it.
Expand Actor -> Info in the Class browser to get to the ZoneInfo item. Add a ZoneInfo item somewhere inside of your zone. Now pull up the properties for your ZoneInfo. At this point, it's just a matter of setting the various value, depending on what you want to do. You can generally mix and match settings to combine effects if you need to.
Set ZoneInfo -> bFogZone to True. You'll also need to set the ZoneLight -> FogDistance value to a small number, such as zero.
Set ZoneInfo -> bGravityZone to True. Change the X, Y, and Z values under ZoneInfo -> ZoneGravity to alter the zone's gravity. To make the player lighter, increase the Z value. Be careful not to set it to zero or higher, since the Deus Ex gameplay interface isn't really designed to handle zero gravity!
You can finely control the ambient light settings within a zone by using the AmbientBrightness, AmbientHue, and AmbientSaturation values under ZoneLight. These three values are the normal light values that you would use in a light actor. Click here for a quick and dirty color chart.
While you may end up using the WaterZone actor to define a normal water area, you can also simply set the ZoneInfo -> bWaterZone of a ZoneInfo to True. It's important to know that there's nothing special about the WaterZone other than that setting. That setting can be combined with many of the other effects.
To make a slippery floor, set the ZoneInfo -> ZoneGroundFriction to a lower value. A value of 0.1 makes it quite slippery.
It's possible to "push the player along" by changing the X, Y, and Z values under ZoneInfo -> ZoneVelocity. If you set the Y value to say, 300, you could simulate a windy tunnel with the wind blowing along the Y-axis.
The U-Pan and V-Pan properities of a brush surface allow you to "scroll" (pan) textures across a brush. You may want to use those setting in a sky zone to simulate overhead cloud movement, for example. You can control the speed that the textures pan by setting the ZoneLight -> TexUPanSpeed and ZoneLight -> TexVPanSpeed. Note than in the case of a sky zone that you already have a SkyZoneInfo item where these values can be changed. But you're certainly not limited to sky zones.
There are a number of other values in the ZoneInfo that can be set, so experiment!